
Using GitHub Actions to deploy to Posit Connect Cloud
We’ve previously extolled the virtues of automating the repetitive chores we encounter, allowing us to focus on the tasks that matter. Three years ago, we posted an example of how to automate the deployment of a Shiny application to shinyapps.io from a GitHub Actions. When a new commit was pushed to the GitHub repository, it triggered an automated pipeline to bundle the Shiny application source code and send it to shinyapps.io. You could relax, knowing that the production deployment was always up-to-date.
But in January 2026, Posit announced that shinyapps.io would be closing to new apps at the end of 2026, with all users moving to Posit Connect Cloud. Existing content on shinyapps.io will continue to work before automatically migrating across in early 2027. But if you followed our previous methodology for automating that deployment from a GitHub Actions workflow, you’ll need to adjust your deployment strategy.
Why move to Posit Connect Cloud?
shinyapps.io has provided a faithful service to the Shiny community for a long time. You make your Shiny application, you click “Deploy” in RStudio, some magic happens, then your work appears online for others to access. You didn’t have to think too hard about R packages, build a Docker container, or set up a cloud compute instance to grant access to your app. It was perhaps the simplicity of the deployment process and availability of a free-tier that made it so popular.
Posit Connect Cloud takes what made shinyapps.io so popular, and stacks more features and convenience on top. You’re no longer restricted to just hosting Shiny applications—Posit Connect Cloud can also support Streamlit, Bokeh, Jupyter Notebooks, and all plans allow unlimited hosting for rendered Quarto and R Markdown documents1. You also get more functionality: the ability to set secret variables, regenerate content on a schedule, higher maximum compute limits, and SSL certificates when using custom domains.
A free-tier of Posit Connect Cloud also remains. And while Posit Connect Cloud supports more types of content beyond just Shiny applications, you will find that benefit is reflected in the higher prices on paid-tiers over their nearest shinyapps.io equivalents. Perhaps the biggest winners are users who mainly just needed a custom domain: This required the highest $349/month “Professional” tier on shinyapps.io, but is now available (with SSL certificate) on the $59/month2 “Enhanced” tier and above on Posit Connect Cloud.
Deploying content to Posit Connect Cloud
The existing deployment methods used for shinyapps.io still work with Posit Connect Cloud, but there are some new options too:
The Quarto CLI can deploy to Posit Connect Cloud using the
quarto publishcommand.You can grant Posit Connect Cloud access to your GitHub account to perform a Git-backed deployment, where it will monitor the code for changes and automatically re-deploy when the target branch is updated. The only extra step you need to do is to commit and push a manifest.json file, which is often as simple as running the following in R:
rsconnect::writeManifest()
The Git-backed deployment may be a very useful replacement to those who have previously deployed content to shinyapps.io from GitHub Actions; The deployment work is now handled by Posit Connect Cloud rather than using up your GitHub Actions allowance. If that method works for you, it’s what we’d now recommend in most cases. But there are some circumstances where you may still want to automate deployment from your own CI/CD process:
- You only want deployment to happen after earlier pipeline checks are successful.
- You have sensitive code elsewhere in your GitHub account, and don’t feel comfortable or aren’t allowed to grant access to your GitHub repositories to a third-party tool.
- You’re on the free-tier of Posit Connect and have code in a Private GitHub repository.
- You want to include extra resources that aren’t stored in the GitHub repository, such as a moderately-sized read-only dataset that rarely updates. Here you might want to use the GitHub Actions workflow to pull external resources together and create a fully self-contained application bundle of source code and static data. This can reduce data export costs on busy applications.
Deployment to Posit Connect Cloud using GitHub Actions
So you might want to automate deployment, but not be able to use the standard Git-backed deployment methods. Let’s discuss how to make it work.
Obtain a Content ID
The first thing you’ll want to do is perform an initial deployment of the application so that we have a Content ID.
The easiest way to do this is using the one-click deployment method from RStudio, or through the Posit Publisher extension in Positron or VS Code.
Log in to your Posit Connect Cloud account and find the content in your list. In the Settings menu, go to URL and look at the “Default URL”.
It should contain a UUID-like section after the https:// and before the .share.connect.posit.cloud parts—we want to make a note of this for later.
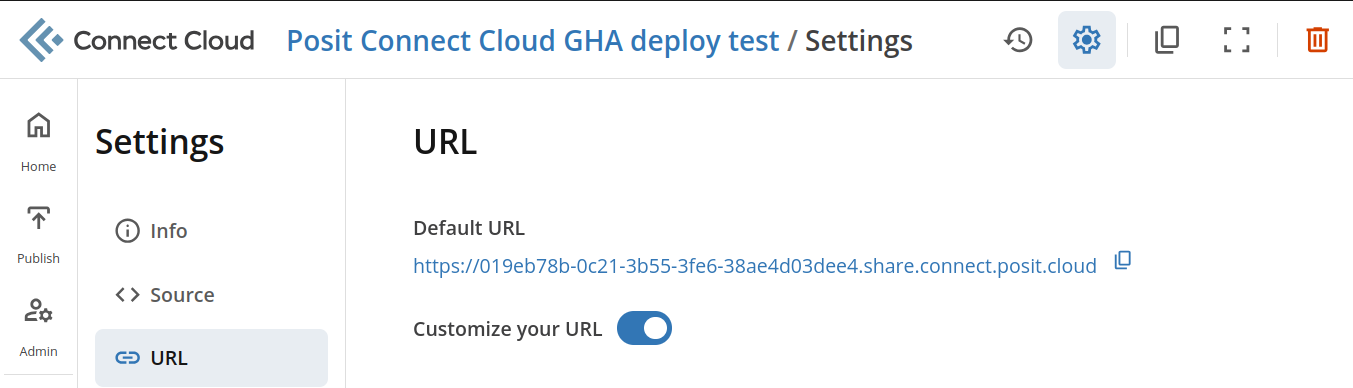
The “Default URL” in the settings menu for your content contains the Content ID.
In this example, the default URL is https://019eb78b-0c21-3b55-3fe6-38ae4d03dee4.share.connect.posit.cloud, so the Content ID is 019eb78b-0c21-3b55-3fe6-38ae4d03dee4.
This manual initial deployment is also a good opportunity to ensure that the deployed application is working in the first place—if your app doesn’t work when deployed from your IDE, then it’s unlikely to work when the same stages are performed in a GitHub Actions workflow.
Add an renv.lock file
You’ll also want to maintain an {renv} lockfile to record which packages were used during development. These matching packages will be used in the deployed version of the application for maximum compatibility. We’ll ask {renv} to use {pak} when restoring these R packages during the GitHub Actions workflow—{pak} is generally faster at package installation and can automatically install all the system dependencies needed for the packages. Remember to commit and push the renv.lock and other relevant {renv}-related files to the Git remote.
Create a Posit Connect Cloud token
Your Posit Connect Cloud account is part of your larger Posit Cloud account. In Posit Cloud, you can access a list of your “Credentials”, which are access tokens. These can be found at https://login.posit.cloud/identity/credentials.
You’ll have the option to create “New Credentials”.
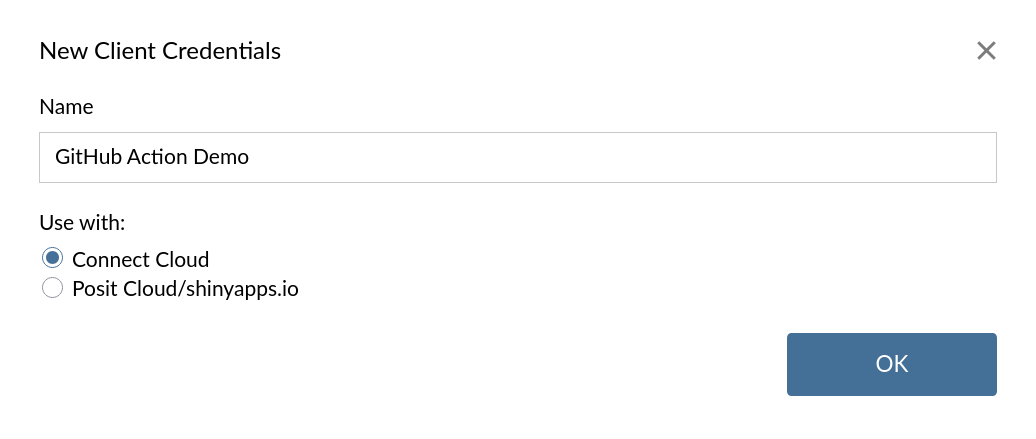
Provide a name for the new token that helps identify where it will be used, then for the “Use with” option, select “Connect Cloud”. Click “OK” to generate a token.
You’ll be presented with a block of R code containing the credentials you can use to log in. These should be kept secret; Anyone with these details is able to impersonate you. It should resemble this:
rsconnect::connectCloudClientCredentials(
  clientId="01234567-89a1-b2c3-d4e5-f60123456789",
  clientSecret="SuPeR/SeCrEt/VeRy/LoNg/CoDe",
  account="<YOUR_ACCOUNT_HERE>"
)
We’ll need these when we come to set GitHub Actions variables and secrets later.
Write a GitHub Actions Workflow
We’ll be creating a GitHub Actions workflow with a number of stages. In the root of our Git repository, we’ll make a file at .github/workflows/deploy.yml.
# .github/workflows/deploy.yml
name: Deploy to Posit Connect Cloud

on:
  push:
    branches:
      - main
      - master
  workflow_dispatch:

jobs:
  deploy:
    runs-on: ubuntu-latest

    steps:
      - name: Checkout repository
        uses: actions/checkout@v4

      - name: Setup R
        uses: r-lib/actions/setup-r@v2
        with:
          r-version: "4.6.1"

      - name: Install pak
        run: |
          UBUNTU_CODENAME=$(lsb_release -cs)
          Rscript -e "
            install.packages('pak', repos = 'https://packagemanager.posit.co/cran/__linux__/${UBUNTU_CODENAME}/latest');
          "

      - name: Instruct renv to use pak in .Rprofile
        run: |
          echo 'options(renv.config.pak.enabled = TRUE)' >> .Rprofile

      - name: Restore packages from renv.lock file
        uses: r-lib/actions/setup-renv@v2

      - name: Install rsconnect if not present in renv.lock
        run: |
          Rscript -e "if (!requireNamespace('rsconnect', quietly = TRUE)) pak::pak('rstudio/rsconnect')"

      - name: Authenticate with rsconnect
        run: |
          Rscript -e '
            rsconnect::connectCloudClientCredentials(
              clientId = Sys.getenv("RSCONNECT_CLIENT_ID"),
              clientSecret = Sys.getenv("RSCONNECT_CLIENT_SECRET"),
              accountName = Sys.getenv("RSCONNECT_USERNAME"),
              name = NULL
            )
          '
        env:
          RSCONNECT_CLIENT_ID: ${{ secrets.RSCONNECT_CLIENT_ID }}
          RSCONNECT_CLIENT_SECRET: ${{ secrets.RSCONNECT_CLIENT_SECRET }}
          RSCONNECT_USERNAME: ${{ vars.RSCONNECT_USERNAME }}

      - name: Add Posit Connect deployment config file
        run: |
          mkdir -p "rsconnect/${SERVER}/${RSCONNECT_USERNAME}"
          cat > "rsconnect/${SERVER}/${RSCONNECT_USERNAME}/${APP_NAME}.dcf" <<EOF
          name: ${APP_NAME}
          title: ${APP_TITLE}
          username: ${RSCONNECT_USERNAME}
          account: ${RSCONNECT_USERNAME}
          server: ${SERVER}
          hostUrl: https://api.${SERVER}/v1
          appId: ${CONNECT_CONTENT_ID}
          EOF
        env:
          SERVER: connect.posit.cloud
          APP_NAME: ${{ vars.APP_NAME }}
          APP_TITLE: ${{ vars.APP_TITLE }}
          CONNECT_CONTENT_ID: ${{ vars.CONNECT_CONTENT_ID }}
          RSCONNECT_USERNAME: ${{ vars.RSCONNECT_USERNAME }}

      - name: Deploy to Posit Connect Cloud
        run: |
          Rscript -e '
            rsconnect::deployApp(
              appDir = ".",
              appId = Sys.getenv("CONNECT_CONTENT_ID"),
              appTitle = Sys.getenv("APP_TITLE"),
              logLevel = "verbose",
              account = Sys.getenv("RSCONNECT_USERNAME"),
              forceUpdate = TRUE
            )
          '
        env:
          CONNECT_CONTENT_ID: ${{ vars.CONNECT_CONTENT_ID }}
          APP_TITLE: ${{ vars.APP_TITLE }}
          RSCONNECT_USERNAME: ${{ vars.RSCONNECT_USERNAME }}

      - name: Clean up account details
        run: |
          Rscript -e '
            rsconnect::removeAccount(
              name = Sys.getenv("RSCONNECT_USERNAME")
            )
          '
        env:
          RSCONNECT_USERNAME: ${{ vars.RSCONNECT_USERNAME }}
As an aside, you may notice there’s a stage named “Add Posit Connect deployment config file”.
What’s that needed for?
When you deploy content the first time using the {rsconnect} package, it will keep a record of some metadata of where it was deployed to in a .dcf file.
If you re-deploy the content, {rsconnect} will try to overwrite the existing deployment, by identifying the target by the unique Content ID.
Without knowing the Content ID, {rsconnect} has to assume that it’s not safe to overwrite any existing content, and new content must be created instead.
Creating a .dcf file and populating it with some details on where the content was previously installed to convinces {rsconnect} that it is safe to overwrite the existing deployment.
Set GitHub Actions variables and secrets
The deploy.yml file requires a number of secrets and variables to be configured in the GitHub Actions workflow. Remember that secrets will be censored in log messages, while variables will be visible.
Head to the “Settings” page for your GitHub repository, and in the side menu go to “Secrets and variables”, then “Actions”.

There are two secrets to set:
RSCONNECT_CLIENT_ID: TheclientIdvalue from your Posit Cloud credentials.RSCONNECT_CLIENT_SECRET: TheclientSecretfrom the Posit Cloud credentials.
Followed by four variables:
RSCONNECT_USERNAME: Your Posit Connect Cloud username, which you set when you created an account. If you have forgotten this, look at the URL once you have logged in to Posit Connect Cloud; The URL will take the formathttps://connect.posit.cloud/<your-username>.APP_TITLE: A display title for your content. This is the title that will appear in your list of deployed content when logged into Posit Connect Cloud.APP_NAME: An internal application name. For simplicity, you could set this to yourAPP_TITLEbut with spaces and punctuation replaced with hyphens. For example, “My useful application” becomes “my-useful-application”.CONNECT_CONTENT_ID: The Content ID we obtained after the initial deployment to Posit Connect Cloud.
Extending to dev deployments
The example we’ve shown above is designed to deploy when you push to your main or master branch.
But if you want a separate deployment for development applications, you can simply extend this action to deploy when changes are pushed to a dev branch, but remember that you’ll need to target a different Content ID, otherwise changes pushed to the dev branch will overwrite your deployment from the main branch.
But keep in mind that “Basic” and “Free” accounts have a limit on the number of applications and a development deployment would count as a separate application to the main deployment. The apps on both these tiers will also be public.
Migration and hosting advice
For users with content already on shinyapps.io, Posit has provided a migration tool to help move your content now, otherwise it will be automatically moved across in early 2027. Links to your content on shinyapps.io will automatically redirect to the new content when done through this tool.
It’s worth using the tool as it allows you to preview and test that the application will work on Posit Connect Cloud. Older applications that use old dependencies or private packages are most likely to encounter issues when migrating to Posit Connect Cloud.
At Jumping Rivers, we often encounter packages and applications that need bringing up-to-date. Our R and Python experts can provide advice and solutions for migrating your content to new hosting solutions that match your needs. Contact us at hello@jumpingrivers.com to see how we can help.